Pattern: Frida's Flowers Blanket by Jane Crowfoot
Yarn: Drops Muskat (100% cotton)
Hook: 3,5 and 4,0 mm
I followed the instructions for most parts. After the first round or so I stopped switching between 3,5 and 4 mm hooks, as I thought that blocking would do the trick of making the pieces same size. Which it did. The only real modification was that I added more colors to the edging. I wanted to use up as much of the yarns as possible, but I think I'll be making some amigurumis in the future as there's still a bag full of bright colour cottons in my stash...

What's the latest fad in Finnish crochet world? It's protective tentacles ("Turvalonkero" in Finnish) without a doubt. What's all the fuzz about and why is everyone suddenly crocheting amigurumi octopuses?
These octopuses are crocheted for babies that were born prematurely. The reason is the tentacles, something safe that a little hand can hold on to. Babies have the need to grab something, and in an incubator there is always the danger that little hands grab a tube that's there to help them grow stronger. With a little octopus by their side, preemies can hold on to something safe. They find comfort in holding the tentacles and the important equipment stays safe.
Check out this video by Yle (Finnish Broadcasting Company). It's in Finnish, but you can see how the octopus toy works in the incubator for Nelli who weighs a mere 830 grams. It must have been after this video that everyone in Finland started crocheting little octopuses!
There was one hospital in Finland that called for crocheters to help them by making these protective tentacles, and it kind of escalated from there to a nation wide phenomenon. Annika Pakkanen gave birth to a child 3,5 months premature. With her little preemie at the hospital in an incubator, she learned about protective tentacles and made the first one for her own child. Unfortunately, her child did not make it, but died at the age of 2,5 months. To help in her sorrow, Annika has since then crocheted 118 octopuses more for the hospital. She shared her pattern through Yle so other people could crochet more protective tentacles for other hospitals in Finland and keep the memory of her child alive. And with her permission, I have translated the pattern so those of you who don't speak Finnish can make some for a hospital near you! However, please inquire at the hospital for any safety issues first. For example, in Finland hospitals require that the tentacles have been washed in 60'C before donating them. There is a Danish Octo Project that can be contacted for more information.

Protective tentacles
You need:- Crochet hook size 2 and 3.5 mm
- Tapestry needle
- Black and white yarn for the eyes
- Fiber fill
- Colorful yarn for the octopus: cotton/bamboo or anything that you can wash in 60’C and that won’t emit dust (pictured: Novita Miami and Novita Puuvilla-Bambu)
Body
R1: With colorful yarn, 6SC in magic loop using 3.5 mm hookR2: 2 SC in each st around (12 sts)
R3: *SC 1, 2 SC in next st* rep 6 times (18 sts)
R4: *SC 2, 2 SC in next st* rep 6 times (24 sts)
R5: SC around (24 sts)
R6: *SC 3, 2 SC in next st* rep 6 times (30 sts)
R7-9: SC around (30 sts)
R10: *SC 3, dec 1* rep 6 times (24 sts)
Break yarn.
Bottom and tentacles
Work rows 1-4 as in body, using 3.5 mm hook. Start working on the tentacles without braking yarn. Chain 40, skip 1st ch, sc in following 39 (to make tentacles curly, add 1-2 sc in every few chains). Tentacles should be max 22 cm in length for safety reasons. Sl st to next SC. Repeat for a total of 6 tentacles, more or less. Break yarn.Eyes
Using black yarn and 2 mm hook, 6SC in magic loop, close loop with sl st, break yarn. With white yarn, 2SC in each sts around (12 sts). Break yarn and make another one (leave long strand on the second eye for sewing eyes in place).Sew eyes on body, pull loose ends to WS. Stuff body with fiber fill. Attach bottom to body starting between the eyes and between middle tentacles. Weave in ends.
Alternatively, you can crochet the octopus in one piece:
Work body as above, but do not break yarn. Sew eyes on body and continue with tentacles as in bottom above. After 6th tentacle continue with SC for rest of the row.
R12: SC around (24 sts)
R13: *SC 2, dec 1* rep 6 times (18 sts)
R14: *SC 1, dec 1* rep 6 times (12 sts)
Stuff with fiber fill.
R15: dec 1 around (6 sts)
Break yarn. Weave in ends.

Edit April 29: Corrected history of the pattern.
Edit Feb 21: Added link to the Danish project and safety notice.
Easter provided a good excuse to pick up my crochet hook again. After the success with my amigurumi fruits and vegetables I wanted to make some Easter decorations with left over yarns. I also wanted to make something for my sister, as we were going to visit her during Easter. I found a lovely pattern for a decorated Easter egg, and then I found this self-striping yarn in my stash and tried that with a simple egg pattern. I like them both, and so does Troll Princess, who actually threw a fit when she discovered that these amigurumi were not made for her and she explicitly told me that I wasn't allowed to give the little eggs to my sister. I might have to make a couple more of these.


Pattern: Epsiej's Easter eggs
Yarn: Novita Miami
Hook: 2,5 mm


Pattern: The Craft Frog's Eggs
Yarn: Novita Nalle Kukkaketo
Hook: 2,5
I came across some cute amigurumi crochet on Instagram and thought that it would be nice to crochet something similar, but I don't have time for something like that. I'm a serious knitter, after all. A couple of days later I realized that crocheted food would make a great Christmas present for Troll princess. At the moment, she is using pearls and slugs as food in her kitchen and getting rid of those small items scattered around her room would make everyone happy.

There are so many amigurumi patterns on Ravelry that it was difficult to know what to start with. I narrowed the selection by choosing to go with fruit and veggies only. I want my kids to make healthy choices!

I've been adding one veggie at a time to the collection. These are fun projects, as it takes about an hour to make one so you can take a break from other projects and quickly finish something. I've been posting pics of the finished items on Instagram along the way, and Troll princess has seen many of the pics. The response has been exactly what I was hoping for: "Woolly mushroom! Mom, show me that pic of the woolly mushroom! Could you make one like that for me, please?".

This has been a very rewarding project for me as well. As I was pregnant with Young warrior almost 7 years ago, I took some old towels and used them to sew diapers for the baby. Two babies later I now cut the diaper fillings into small pieces and used them as filling for the toys. Not only did I get rid of some leftover yarns, but I also managed to re-recycle these old towels!
Another bonus: I learned crochet vocabulary in English, so I was able to translate my Korppi place mat pattern in English.

Thank you for sharing these patterns:
Look at this crap I made!
- Tomato, mushroom, bell pepper

Lion Brand yarns
- Eggplant, apple

Nyanpon's knit and crochet
- Leek, beet

Kristi Tullus
- Carrot
Sheep Dog's Fleece
- Cabbage
Johanna Karlsson
- Banana
PlanetJune
- Pear


There are so many amigurumi patterns on Ravelry that it was difficult to know what to start with. I narrowed the selection by choosing to go with fruit and veggies only. I want my kids to make healthy choices!

I've been adding one veggie at a time to the collection. These are fun projects, as it takes about an hour to make one so you can take a break from other projects and quickly finish something. I've been posting pics of the finished items on Instagram along the way, and Troll princess has seen many of the pics. The response has been exactly what I was hoping for: "Woolly mushroom! Mom, show me that pic of the woolly mushroom! Could you make one like that for me, please?".

Another bonus: I learned crochet vocabulary in English, so I was able to translate my Korppi place mat pattern in English.

Thank you for sharing these patterns:
Look at this crap I made!
- Tomato, mushroom, bell pepper

Lion Brand yarns
- Eggplant, apple

Nyanpon's knit and crochet
- Leek, beet

Kristi Tullus
- Carrot
Sheep Dog's Fleece
- Cabbage
Johanna Karlsson
- Banana
PlanetJune
- Pear

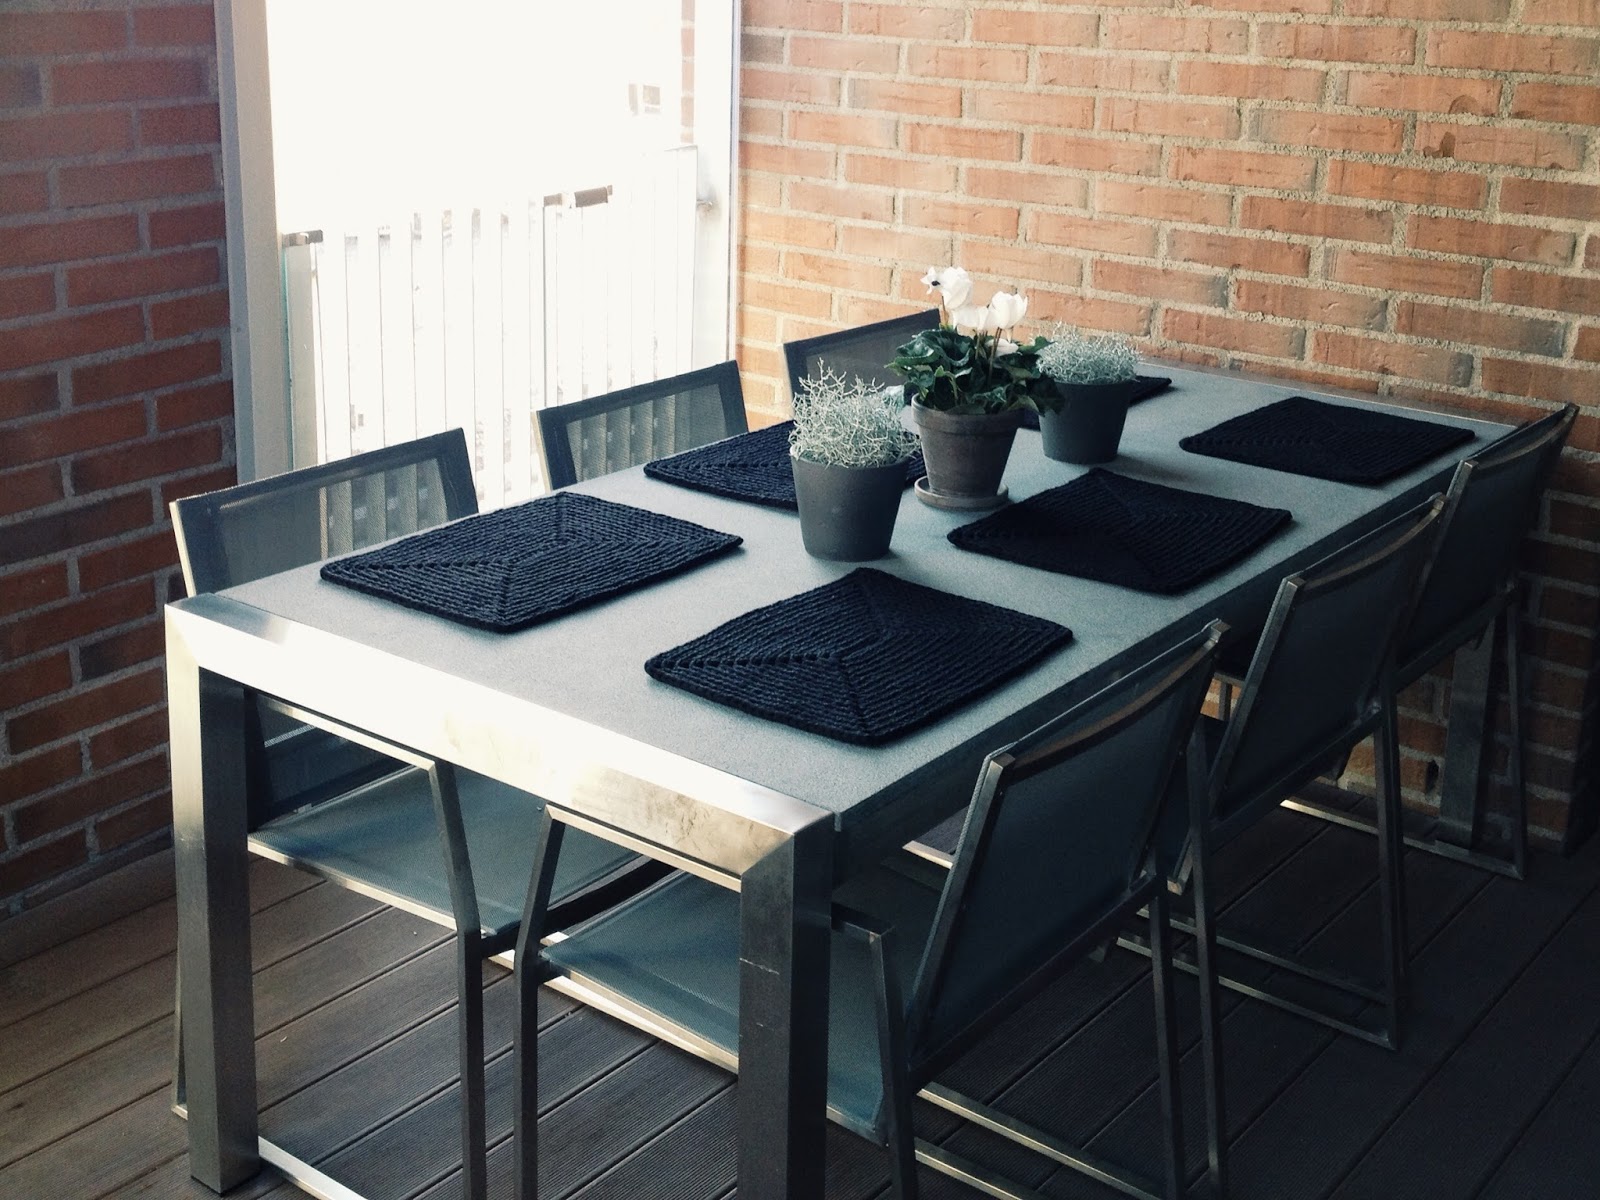
There are two things that I don't really enjoy: interior design and crochet. Well, actually I do enjoy crochet, it's just not something you can do while reading and there aren't too many things you can crochet that would also be useful and look nice. Having said that, I have crocheted a couple of things for our home and when I noticed that we need place mats for our balcony table I got the idea to crochet them. I chose Novita Tuubi as the yarn, as I've used that for baskets before and I like the way the baskets turned out. Well, I also like the way the place mats turned out!

The thing I didn't like about crocheting the place mats was the way it hurts my hand to do it! Maybe because of that or maybe because of some other reason (such as the other 10 or so WIPs...) it took me all summer to crochet 6 place mats. At some point after listening to me complain, Business woman even suggested that I should only make 4 as there are only four of us in the family. But the table is for 6, so it needs 6 place mats! Just in time for the end of the summer I finally finished this project, and I'm glad I managed to do all 6.

I was thinking about writing the pattern for these place mats, but I guess you can see the pattern from the pictures so there's no reason for me to learn crochet vocabulary in English. For my Finnish friends, I've included the instructions below.

Now I can relax and enjoy the last summer sunsets on the balcony, with my knitting and wine glass on the new place mats!

Korppi-tabletit
Virkkaa 10 kjs ja niihin 10 ks. Tee viimeiseen ketjusilmukkaan 3 ks ja käännä työ. Jatka tekemällä ks jokaiseen aloitusketjun silmukkaan. Tee viimeiseen ketjusilmukkaan 3 ks ja aloita 2 krs. Nyt virkkaa ks:t edellisen krs:n kiinteiden silmukoiden takareunaan. Tee aina kulmasilmukkaan 3ks ja jatka näin 14 krs. Päätä piilosilmukalla ja päättele lanka.

Edit Nov 27: I happened to be following a crochet pattern in English, thus learning the English vocabulary, so here is the translation:
R1: 10 CS
R2: 9 SC, 3 SC in next stitch, turn the piece and work on the front loop of the original sts: 9 SC, 3 SC in next stitch.
From the third row on, work in back loops of stitches
R3: 10 SC , 3 SC in next stitch, 1 SC, 3 SC in next stitch, 11 SC, 3 SC in next stitch, 1 SC, 3 SC in next stitch
Continue in a similar manner for 14 rows, bind off and weave in ends.
The thing I didn't like about crocheting the place mats was the way it hurts my hand to do it! Maybe because of that or maybe because of some other reason (such as the other 10 or so WIPs...) it took me all summer to crochet 6 place mats. At some point after listening to me complain, Business woman even suggested that I should only make 4 as there are only four of us in the family. But the table is for 6, so it needs 6 place mats! Just in time for the end of the summer I finally finished this project, and I'm glad I managed to do all 6.

I was thinking about writing the pattern for these place mats, but I guess you can see the pattern from the pictures so there's no reason for me to learn crochet vocabulary in English. For my Finnish friends, I've included the instructions below.

Pattern: Korppi place mat
Yarn: Novita Tuubi 1722 g (6 items)
Hook: 8 mm
Now I can relax and enjoy the last summer sunsets on the balcony, with my knitting and wine glass on the new place mats!

Korppi-tabletit
Virkkaa 10 kjs ja niihin 10 ks. Tee viimeiseen ketjusilmukkaan 3 ks ja käännä työ. Jatka tekemällä ks jokaiseen aloitusketjun silmukkaan. Tee viimeiseen ketjusilmukkaan 3 ks ja aloita 2 krs. Nyt virkkaa ks:t edellisen krs:n kiinteiden silmukoiden takareunaan. Tee aina kulmasilmukkaan 3ks ja jatka näin 14 krs. Päätä piilosilmukalla ja päättele lanka.

Edit Nov 27: I happened to be following a crochet pattern in English, thus learning the English vocabulary, so here is the translation:
R1: 10 CS
R2: 9 SC, 3 SC in next stitch, turn the piece and work on the front loop of the original sts: 9 SC, 3 SC in next stitch.
From the third row on, work in back loops of stitches
R3: 10 SC , 3 SC in next stitch, 1 SC, 3 SC in next stitch, 11 SC, 3 SC in next stitch, 1 SC, 3 SC in next stitch
Continue in a similar manner for 14 rows, bind off and weave in ends.


